Cleaning Washing Machine To Sanitize It And Remove Smells
Here are my tips for cleaning washing machine smells and sanitizing your washer so it performs well for you every time, giving you clean fresh smelling clothing.


What prompted me to think about this topic in the first place? Well, I recently purchased a new, to me, washing machine and wanted to give it a good clean out before I started using it for washing my family's clothes. That prompted me to think about the topic more, and consider what issues I and others have when figuring out how to clean inside a washing machine, and the outside of it.
Why Cleaning Washing Machine Regularly Is A Must
There are a lot of reasons you should clean your washer, inside and out, on a regular basis. The main one is that although your washing machine is designed to clean your clothes, it gets lots of yucky stuff in it on a regular basis, from potty accidents, washing underclothes, and general dirt and debris we collect on our clothes and other washable fabrics.
All this stuff leaves a film of bacteria, mold and mildew in your machine, along with build up from detergent residue and hard water, that can combine over time to make a yucky smelly mess.
Washing your clothes in a dirty machine makes your clothes not as clean, and may even transfer a stinky smell to them, or get them contaminated with bacteria. Can you say "gross" when you consider fecal material bacteria from your child's underwear or diaper on your kitchen towel? Ewww.
Fortunately, a little preventative and regular maintenance on your machine can make it feel like brand new again and keep everything clean as it should be.
Tips For Cleaning Washing Machine Surfaces On The Outside
The primary place you need to clean your washing machine is in its interior, where you wash the clothes. However, that doesn't mean the outside of your machine doesn't need a little cleaning love now and then.
The outside of your washer can get dirty from lint, dust, dripping laundry supplies, etc. Fortunately, it is easy to clean the outside surfaces.
Don't use anything abrasive since it can scratch the surface, nor use anything too strong because it could damage the surface. Instead, a solution of water and a few drops of dish soap should do the trick. After wiping it down with a damp cloth with this solution, rinse with water and dry.
Caution: Be very careful when wiping down the part of your washing machine containing the controls, since you don't want to damage these by getting them too wet.
Don't forget also, if you have a top loader, to also wipe and clean under the lid and also around the top of the washer tub to remove dirt, lint, soap scum, etc. since the methods I describe below won't clean these particular surfaces well.
How To Sanitize Your Washing Machine

When cleaning washing machine parts on the inside one of the most important things to do is sanitize it. This will remove and kill both yucky bacteria, mold and midew spores, but also keep it smelling clean (which we'll also discuss more below).
You should sanitize your washing machine about once a month, and fortunately it isn't very hard to do.
First, wipe out the dirt and link from in the inside of the washer with a damp cloth. Next, run the machine (empty, without any clothes in it) on a large long cycle using hot water and adding a normal amount of detergent. In addition, add about 1 cup of chlorine bleach to the load.
After the washer has completely filled and has agitated for a couple of minutes stop it mid-cycle and let it sit for about 15-20 minutes so the bleach has a chance to really do its job and disinfect the inside of the washer. Then, let the washer finish the rest of its cycle.
Since the washer will do a rinse cycle as it finishes its load all traces of bleach should be gone at the end. However, if you're concerned about bleach harming your next load of clothes you can run an additional empty short cycle if you wish to make sure all traces of bleach are rinsed away.
Cleaning Washing Machine Hard Water And Soap Scum Build Up

Another culprit for a dirty washing machine is hard water build up, and soap scum and detergent residue from your laundry detergent and other laundry supplies.
Soap scum, especially, can cause a dulling and greying of your clothing, so you want to periodically rid yourself of it, about every 4-6 weeks, I would suggest. Further, hard water build up can eventually impede the mechanics of your machine, or block the hoses, so it is best to deal with it periodically so the build up doesn't get too severe.
The steps in cleaning washing machine soap scum and hard water are similar to those for sanitizing your washer listed above, except instead of using bleach you use vinegar.
Just add 3-4 cups of distilled white vinegar (or apple cider vinegar) to a large empty load , using hot water. Don't add detergent to this load though. Again, let it sit, mid-cycle, for 15-20 minutes, or perhaps even longer (up to an hour or so) to allow the acidity in the vinegar to work on removing the limescale and detergent residue from the washing machine basket and other parts.
Again, the rinse cycle on your machine should rinse away all remaining remnants of the vinegar, but you can also run another short cycle if you wish afterward to get rid of any additional vinegar smell if you wish.
Cleaning Washing Machine Trays And Fabric Softener And Bleach Dispensers

Another area of your washing machines, besides the inner basket, that can get quite dirty and even clogged are your fabric softener and bleach dispensers, and other trays, such as your detergent dispenser tray.
The first thing I caution is that each machine is different, so first consult your machine's manual when determining the technique for cleaning waching machine parts such as these.
However, generally, it is best to clean removable trays and dispensers in your kitchen sink, using hot water and dishwashing liquid. You can use an old toothbrush to get into crevices and hard to reach areas. Be sure to rinse them thoroughly since you don't want any suds from the dish soap to get into your machine.
If your washing machine's dispensers are not removable it can be tougher to get them clean.
I actually experienced this myself recently, with my new (to me) machine. Apparently the previous owners loved to use Downy fabric softener, in the April Fresh scent. How do I know this? You could always get a faint whiff of that scent every time I opened the machine. We are a scent-free laundry family, so I looked and looked trying to figure out where this came from.
Finally, I figured out that the scent was coming from big clumps of dried up fabric softener plugging the holes of the dispenser. This is not an uncommon occurrence with liquid fabric softener, since it is oil-based.
Caution: Don't use detergent for cleaning waching machine dispensers, especially fabric softener ones, since the detergent can then combine with the softener and when it gets dispensed on the clothes can cause fabric softener stains.
Instead, try flushing these dispensers with hot distilled white vinegar. Pour about a cup of hot vinegar (heated in the microwave) into the fabric softener dispenser and then running the machine (without clothes, since big blobs of softener can get dislodged) and letting the vinegar get dispensed to help clear out the softener residue and build up.
Another word of caution: while heating the vinegar helps, be careful not to get it so hot it would harm your dispenser. Most of these dispensers are made of plastic, and plastic can warp or melt at boiling temperatures, so that would be too hot. You're aiming for a temperature similar to a nice hot cup of coffee -- you can still sip it without burning your tongue, but it feels good on a nice cold day.
Tips For A Smelly Washing Machine

Many people, especially with front loading machines, complain about getting a washing machine smell.
Often, this smell is from mold or mildew which builds up on the rubber seal on the door of the machine. To get rid of it wipe down the seal, periodically, with this homemade mildew cleaner recipe, or use a mildew cleaner (click the link for reviews of various types on the market from other readers).
In addition to mold and mildew build up, another source of smells are bacteria. Sanitizing, as well as cleaning washing machine parts, can really cut down on this smell.
In addition, here are some more tips to keep in mind to reduce and eliminate washing machine smell:
- Washing your clothes in hot water naturally helps kill mold, mildew and bacteria each time you run a load
- Keep the lid of your machine up, or your washer door open after each load to allow excess moisture to evaporate (since mildew and mold love dark, damp spaces to grow)
- Don't leave your damp or wet clothes in the washing machine for extended periods, but instead remove them promptly to place in the dryer or to line or air dry
Washing Machine Cleaners: Which Work Best?
Above I've provided several homemade recipes for cleaning a washing machine, but there are also several products on the market designed to do the work for you. Typically, you use these washing machine cleaners in a similar way to the homemade products I discussed, but of course, you'll need to read the exact directions for any such product you choose to use.
I've gotten several reviews of these products from readers, to help you decide which is the best one, if you choose to use them:
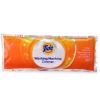 Tide Tide
|
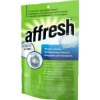 Affresh |
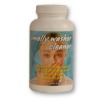 Smelly Washer |
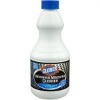 Clorox |
 Lemi Shine |
What To Do When Your Washing Machine Is Causing The Stains!

![]()

Some people have asked me about what to do when their washing machine is what is causing the stains in their clothes. There are many different causes for this problem, but typically there is either a mechanical problem causing grease to come into the inside of the washer, or a part in the machine is chipped and rusted, causing rust spots.
You will need to replace the rusted part and/or fix the mechanical problem typically to keep these washing machine stains from reoccurring.
The only exception to this would be if you've got rust build up inside your washer not from a chipped and rusted part, but from rust in the water itself. In that case one reader had good luck using Super Iron Out to remove the rust residue.
Check out my article all about what to do about mystery washing machine stains for more tips:

Do You Have More Tips For Cleaning Washing Machine?
Although these are my tips for cleaning washing machine parts, inside and out, there are typically lots of good ways to clean large appliances such as this one, and I'd love to hear your tips and tricks, or what methods you've used.

You can share your tips for how to clean a washing machine here. You can also click this link to read other tips from around my website that other readers have already submitted.
Further, this post in part of a series called "How to Clean Anything, Even if You're Not June Cleaver." I hope this series will become a good resource for you, with instructions on many different cleaning projects around your home.
Want More Inspiration For Your Laundry Room?

I'm honored to be part of a great group of blogging ladies who all discuss topics from around our homes. Each month we choose a different room as our theme, so we can all get some inspiration in this area of our homes. We call it the Room by Room Inspiration for Every Room in Your Home.
This month each of us is discussing some aspect of the laundry room. Please check out these other great blog posts from the group:
- Lauren from Mama's Laundry Talk is giving Four Tips for Keeping the Laundry Room in Order
- Christine from I Dream of Clean is sharing 5 Ways to Save Money and Go Green in the Laundry Room
- Nony from A Slob Comes Clean is discussing Hanging versus folding your laundry; and
- Jami from An Oregon Cottage did a Thirty Minute Laundry Room Spruce-Up

Thanks For Visiting My Website: Grab Your Free Gift!

Hi, I'm Taylor, a busy mom with 3 kids, so I have lots of hands on experience with house cleaning, laundry and my fair share of spots, spills and other messy catastrophes. Thanks for visiting my site.

I update the website all the time with tips, tutorials, cleaning recipes, reviews of products from readers like you, and tests I've done on various cleaners, removers and laundry supplies.
I'd love to give you a gift! When you subscribe to my free weekly newsletter you will receive a free printable laundry stain removal chart that you can reference as needed.
I hope you enjoy this gift, and stop by again soon!
Related Pages You May Enjoy
How To Clean Anything Even If You're Not June Cleaver {Series}
Laundry Tips & Tricks For Busy Moms
Go From Cleaning Washing Machine To Sanitize It And Remove Smells To Home Page
CAUTION: This website is provided for informational purposes only. It is provided as is, without warranties or guarantees. Some stains and messes just won't come out, and are permanent. Further, some cleaning methods can harm your item, so if what you want to clean or launder is sentimental or expensive call a professional. See disclaimer of liability for more information.
Popular How To Clean Articles
Let's Stay Connected!
![]()
![]()
![]()
Get Free Email Updates
(and get a FREE printable)
Related Pages

 Green Cleaners: Which Brands Work Best?

 Make Your Own Cleaning Products
 Visit Household Management 101
 Visit Home Storage Solutions 101